Resolve Dropper Post User Manual
Contents
- Warnings and Precautions
- Technology Overview
- How to Use
- Reliability and Testing
- Troubleshooting
- Warranty
- Installation Instructions
1.0 Warning – Read Before Installation or Use
- Read this guide and all other installation, service and maintenance documentation before installing or servicing your dropper post
- Bicycle dropper posts should always be installed, maintained and serviced by a qualified bicycle service technician in accordance with all instructions provided by Wolf Tooth. If you choose to install or service the dropper post yourself, you assume all risk and liability for injury or damage
- Make sure your seat post outer diameter matches the inner diameter of your frame. A mismatch in diameters can cause damage to the seatpost or frame and potentially cause personal injury
- Verify correct and safe operation of your dropper post before riding. If you are unfamiliar with using a dropper post, take time to familiarize yourself with safe operation before riding
- Verify that the dropper remote lever does not interfere with with the brake lever or shifting
- Do not attach any accessories such as lights, fenders or saddle bags to the dropper post stanchion (smaller diameter part that slides into the lower tube). Do not clamp stanchion in a bike stand. Scratches on the stanchion will damage the seal and are not covered by warranty
- Make sure you have selected the correct travel length for your bike and saddle height. Use our dropper post travel length calculator
- Always wear safety glasses when checking or adjusting air pressure or performing any work on the cartridge assembly
- Additional instructions, specifications and details can be found on the Resolve technical specifications page
- If you have any questions, issues or concerns, please contact us: sales@wolftoothcomponents.com or call us at 855-965-3284 and leave a message. We will return your call promptly during normal business days/hours
2.0 Resolve Technology
The Wolf Tooth Resolve Technology cartridge (US patent 10,933,935 & others pending) incorporates a novel self-bleeding feature. Any air that gets into the fluid chamber is automatically purged as you ride with every up/down cycle of the dropper post. This is the key difference between our cartridge and most other dropper posts that use an IFP (Internal Floating Piston). Any design with an IFP requires perfect separation of the air and oil inside the cartridge. If this separation seal ever fails (and it often does), an IFP dropper post will become spongy or sag and require a complex service or wasteful cartridge replacement to fix it. The Wolf Tooth Resolve cartridge is simpler and more reliable than any IFP design and never requires a manual reset like other non-IFP posts do. Our cartridge is fully serviceable and we offer every replacement part – a refreshing change from the throw-away cartridges found in many other posts. Detailed documentation to service and rebuild the Resolve dropper post is also available.
2.1 Self Bleeding Function Notes
If you extend the post with your bike on its side or upside down, the post will draw air into the cylinder instead of oil and will be very spongy. To purge, fully compress the post with the bike upright (riding position), allow the post to sit compressed for 20-30 seconds and extend the post. Repeat if needed. It should be solid again. Note that we discourage intentionally introducing air into the cylinder. Repeatedly introducing air can dissolve excessive air in the oil and it then becomes difficult to get a really solid feel to the post. Storing your bike on its side or upside down is not a problem, nor is hanging your bike from the saddle a problem. However, you should avoid extending the post in any orientation other than vertical (normal riding orientation). If you do plan to store or transport your bike in a non-vertical orientation (i.e. not the normal upright riding position), we recommend having the dropper post partially or fully extended. If it is fully retracted, oil can migrate to the top of the piston and it may take a few full up/down cycles to fully purge the cylinder. Note that a small amount of compliance under load (up to 3mm) is normal for any dropper post (any brand) and will not be noticeable when riding.
Note that the self-bleeding function of the Resolve cartridge requires the dropper post to fully bottom out. Anything that prevents fully bottoming out will reduce the self-bleeding capability. Because of this, we do not recommend using the Wolf Tooth Valais or similar products that limit the downward (retracting) travel of the post. Limiting the extending travel is not an issue – our travel adjust spacers do exactly this.
2.2 Weights and Dimensions
The Wolf Tooth Resolve dropper post has a stack height of only 32 mm. This combined with a short lower tube assembly and adjustable travel means you can fit a longer travel dropper post on a given frame compared to most other brands. The weight vs. travel is also among the lowest of any dropper post and titanium saddle clamp hardware is available for even lower weight and a splash of color. Full weights and dimensions are available on the Resolve Dropper Post Tech Doc Page.
3.0 How to Use
3.1 Actuation Valve and Dropping Process
One of the several improvements with the Resolve Rev2 is the introduction of a pressure balanced valve. Even when your full weight is on the saddle the force required to actuate the lever is unchanged. This allows you actuate your post quickly in situations where you may not have a second to unweight your post before dropping. Rev1 posts do not have a pressure balanced valve so unweighting the saddle a bit before pushing the lever to drop the post will give the best results.
When sitting down to drop the seat post, center your weight on the saddle above the post and guide it downward along the axis of the seat tube (down and forward, not just straight down). Weighting only the back of the saddle and trying to drop straight down will cause wear and binding on this or any dropper post.
3.2 Storing or Hanging Your Bike
The best position for your Resolve dropper post whenever you are not riding is fully extended or retracted 10-20 mm. This is especially important if you will be hanging your bike from a wheel or turning it upside down. In these situations, if the post is in the retracted position, oil will migrate away from the valve at the bottom of the post and it may take a few cycles up/down to fully purge air from the cylinder.
Always avoid extending the post if the bike is not upright in a normal riding position. This can allow large amounts of air into the cylinder and will require a few cycles up/down to fully purge air from the cylinder. If air is intentionally introduced to the cylinder enough times, excess air will become trapped in the oil and it may be difficult to fully bleed.
3.3 Cold Weather
Wolf Tooth Resolve dropper post has been extensively tested through the coldest Minnesota winters (as cold as -30°F / -34°C). While many dropper posts struggle and even fail in very cold temperatures, ours performs reliably. It’s simply the best choice for your fat bike (or any bike) when the temperatures plunge.
Cold weather tips: If there is any water or grease/water emulsion in your dropper post or dropper cable housing, it will freeze and not work in temperatures below 32°F / 0°C! Water can easily become trapped in your bike frame and then migrate into the dropper post or cable so it’s always a good idea to disassemble your post, thoroughly clean all of the old grease and add new grease before winter riding (see 100 hour service procedure).
The air pressure inside the post will also be reduced at cold temperatures. If your dropper post is not extending smoothly in the cold, check or adjust pressure near the temperature you plan to ride at. Don’t assume the pressure you set in your warm house will be sufficient in the extreme cold. Note: dropper post must be upright and fully extended to check or adjust air pressure, always wear safety glasses.
If you are riding at cold temperatures and bring your bike into a warm building with the post fully extended, the fluid will expand as it warms and it may be very difficult to actuate the dropper lever. In this case, bring the bike back out in the cold to reduce the pressure and then lower the post 10-20 mm before bringing it back inside. The best solution to prevent this is to simply leave your dropper post slightly retracted before moving from a cold to warm environment.
3.4 Extend Speed and Adjusting Reservoir Pressure
The extend speed of the Wolf Tooth Resolve dropper post is fast and it makes an audible "thunk" both up and down. This is intentional as we have found posts that are slow and quiet are hard to use on the trail because you don't get good audible confirmation of up/down position. The extend speed can be slowed somewhat by reducing the reservoir pressure. The acceptable range is 150-260 PSI (10 - 18 bar). For best results, we recommend at least 200 PSI.
*** Always wear safety glasses when adjusting or checking air pressure ***
To check or adjust pressure:
- Always position the bike or post upright (riding orientation) before checking or adjusting air pressure! Failure to do so can result in excessive oil loss
- Fully extend the dropper post (never connect shock pump to a partially or fully retracted post)
- Remove the saddle clamp and saddle
- Remove the air cap
- Connect shock pump
- Inflate to desired pressure and remove pump
- Replace air cap and saddle
Note: the largest pump head diameter that will fit on Resolve is 14 mm max

Note: Connecting the pump will reduce the pressure by 30-50 PSI as the air volume is very small. Example: if you connect the pump and the gauge reads 200 PSI, your post was at 230-250 PSI before you connected the pump. Always re-inflate to the correct pressure before removing the pump. Removing the pump will not reduce the pressure inside the post.
Note: If you need to reduce air pressure, always use the air bleed function on a shock pump to slowly bleed air pressure. Never release air by depressing the Schrader valve with your finger or a tool. Never release all air from the dropper post unless you need to service the cartridge. Rapid and full release of air pressure can cause excessive oil to come out with the air. If this happens, the cartridge will require service to replace the lost oil.
3.5 Seatpost Clamp Torque
The maximum seat collar torque is 4 N-m. Note that all 30.9 mm dropper posts (Wolf Tooth and other brands) are sensitive to excessive seat collar torque and may require reservoir pressure near the high side of the spec to operate smoothly. Some frame and seat collar designs can be more prone to binding as well. Using a Wolf Tooth seat collar is recommended but not required.
3.6 Minimum Insertion Depth
The safe minimum insertion depth is always the greater of the number marked on the dropper post or the frame manufacturer's specification. Example: our 200 mm dropper post has a minimum insertion depth of 140 mm whereas most frames specify 90-110 mm. In this case, you must observe the larger number of 140 mm required for the seat post.
The minimum insertion depth is clearly marked on the Resolve dropper post lower tube and varies between 90 and 182 mm. Always follow the minimum insertion depth recommended by your bike frame manufacturer if it is greater than the number marked on your dropper post. Never install the dropper post with the minimum insertion line showing, even if the frame allows a shorter insertion than what is marked on the post. Insufficient insertion depth can result in damage to the frame or seat post and injury to the rider.
3.7 Lower Tube Diameter Change
The resolve dropper post is available in either 30.9, 31.6, and 34.9mm diameters. Most components for our 34.9 posts are unique (with a few exceptions) and cannot be used with our 30.9 or 31.6 posts. However, all components except the lower tube are shared between 30.9 and 31.6 posts for a given travel length. It is relatively easy to change the lower tube if you wish to use your post on a bike with a different seat tube diameter. The lower tubes can be purchased from Wolf Tooth and the detailed instructions can be found in the service manual . A different lower tube may also require 1 or more different diameter anti-rotation pins.
3.8 Air Filter and Periodic Maintenance
Internal contamination from trail dust is the leading cause of wear on most dropper posts. The Wolf Tooth Resolve dropper post incorporates an external air filter to prevent this. This foam air filter can easily be replaced with just a retaining ring pliers. Details at the link below.
Maintenance intervals: Refer to the Resolve dropper post full rebuild and service page for maintenance process details.
- Before every ride – check for smooth up and down operation, verify saddle is secure and clamp bolts are torqued to 6 Nm
- After every ride – clean any dirt or water from stanchion and wiper seal using a microfiber or other soft cloth. Inspect dropper post for damage
- Every 100 riding hours or as needed – disassemble lower tube/stanchion, clean and re-grease, replace air filter. Replace cable housing and cable at this time as well
- As needed, depending on riding environment and frequency – full cartridge rebuild, fluid change, etc. Note: cartridge service should rarely be required and is not part of the periodic maintenance requirement. We recommend not opening the cartridge unless a specific issue is noted
3.9 Adjusting Travel
The travel of a Resolve dropper post can be reduced in 5 mm increments by adding spacers inside the cartridge assembly. This feature allows maximizing the amount of drop on any given bike frame / rider combination. Detailed instructions can be found on the Resolve dropper post full rebuild and service page.
Note that installation of travel adjustment spacers requires opening the pressurized hydraulic cartridge and should always be performed by a qualified bicycle technician after releasing all air pressure. This is not recommended as a home mechanic project unless you are already experienced with servicing pressurized bicycle hydraulic components such as suspension forks. Always wear safety glasses and follow all instructions.
4.0 Reliability and Testing
The Resolve dropper post has been tested by an independent laboratory to verify that it meets ISO 4210 and EN 14766 durability specifications. We have also performed in-house testing on specially constructed equipment that far exceeds the industry standard specifications. During the development process, we have ridden thousands of miles in the worst possible conditions with no failures or issues. The development and testing of this dropper seat post took over 4 years, dozens of prototypes and thousands of engineering hours. The end result is a proven and reliable dropper post that exceeds the performance of most other posts on the market.
4.1 Rider Weight Limit
The specified limit of a fully equipped rider is 120 kg / 264 lbs. The industry standard testing does not anticipate heavier riders. Exceeding this weight will void the warranty and could lead to personal injury
4.2 Ebike compatibility
The Resolve Dropper Post is compatible with any ebike that uses a conventional dropper post mounting and actuating system
5.0 Troubleshooting
*** Always wear safety glasses when adjusting or checking air pressure ***
Post does not extend smoothly:
- Check air pressure (post must be upright and fully extended when checking). Inflate to 260 PSI (18 bar)
- Check seat collar torque. Loosen seat collar bolt, then tighten with torque wrench (30.9 post: 4 Nm max, 31.6 post: 5 Nm max)
- Perform lower tube clean/grease process if needed. Dirt and dried out grease will degrade the performance of your post and increase wear.
- Install 1 or more smaller diameter anti-rotation pins as part of lower tube service. Note that smaller pins will also increase the amount of saddle rotational play
Saddle has excessive rotational play:
- Install 1 or more larger diameter anti-rotation pins as part of lower tube service
- Note a few degrees of play is normal and required to prevent binding, especially on a 30.9 post
Post has sag or squish:
- Make sure the post is upright (normal riding orientation). Post must remain upright / vertical during this entire process
- Fully extend then fully retract post
- Allow to sit retracted for 20-30 seconds and then extend. Repeat if necessary
- Note that a small amount of compression (up to 3 mm) under load is normal for the Resolve and every hydraulic dropper post
- If cycling the post does not resolve the issue, a fluid change or cartridge seal replacement may be required
Post sticks in the retracted position:
- This may happen if the post has not been used for some time as the o-ring seals can squeeze out the oil film and stick to the piston rod and cylinder bore. This is more common on a new post or a used one that needs lower tube service. Simply pull up on the saddle while holding the remote lever open. Do not attempt to do this while riding!
- Check air pressure and set to 260 PSI (18 bar)
- Check seat collar torque. Loosen seat collar bolt, then tighten with torque wrench (30.9 post: 4 Nm max, 31.6 post: 5 Nm max)
- Perform 100 hour lower tube service
Unable to depress dropper remote lever:
- If post was used in cold weather and then warmed up while fully extended, it can “hydrolock” due to the pressure of the expanding fluid. This can also happen if the bike/post is stored in a hot car in the fully extended position.
- The best solution is to bring the post back outside and allow to cool down
- Once cool, depress the dropper remote lever and push the seat post down a bit
- To prevent this condition, retract the post slightly before it can warm up. As long as it is not fully extended, the fluid is free to expand without building up pressure.
Post slips downward in frame or rotates too easily:
- Verify correct seat collar torque
- Seat collar torque can be increased slightly above the recommended amount as long as post still extends and retracts smoothly. This will be highly dependent on bike frame and seat collar design.
- Apply carbon fiber grip paste to frame/seat post interface.
Post creeps up or down without depressing the dropper lever:
- Turn barrel adjuster inward (clockwise) to release tension on cable
- Check for binding or obstruction of cable or actuator on bottom of dropper post
- Remove dropper post from bike and retract by manually actuating the valve. If post is creeping up or down fully removed from bike with cable not attached, there is an internal leak. Contact Wolf Tooth customer service for assistance.
Creaking noise:
- Note: we have never had issues with the dropper post creaking in extensive test riding over thousands of miles and many riders. As with any component, it could happen though.
- First, make sure it’s coming from the dropper post. There are many things that can creak on a bike and it can be difficult to pinpoint the source. There are good resources online for troubleshooting various creaking noises on your bike.
- If you are sure it’s related to the post, determine if it’s from the interface with the seat tube or from the saddle clamp.
- If it’s the seat tube, first clean thoroughly (both the post lower tube and inside the seat tube) and then try grease or carbon grip paste.
- If it’s the saddle clamp, first verify that the bolts are torqued to 6 Nm
- If torquing the bolts does not help, remove the saddle, clean all of the components with a microfiber cloth and reassemble
- As a last resort, you can try a thin film of grease or (better yet) anti-seize compound on the various clamp components and the saddle rails. We have never found this to be necessary but it’s something to try if no other solution is available.
6.0 Warranty
Your new Wolf Tooth Resolve dropper seat post is warranted for defects in material or workmanship for a period of two years from the date of purchase. Proof of purchase is required for all warranty claims. The warranty applies only to the original owner and is not transferable. The warranty is at the sole discretion of Wolf Tooth Components, LLC and is limited to the repair or replacement of the defective part(s) and this is the sole remedy of the warranty. The warranty does not cover normal wear and tear, routine maintenance, improper installation or use. Wolf Tooth Components, LLC shall not be responsible for incidental or any other costs incurred by the user or warranty service provider that are not expressly covered by this warranty. Any modifications to the seat post or failure to follow installation and maintenance instructions voids the warranty. The user assumes all risk of injury or property damage if the seat post is modified or used improperly. Warranty duration and laws may vary from state-to-state and country-to-country.
Always contact us before returning a seat post for warranty evaluation (or any service). Include a detailed written description of the issue along with photos showing the issue if it is visible. Email with the subject “dropper post warranty” to: warranty@wolftoothcomponents.com
7.0 Installation Instructions
7.1 Dropper Post Installation Instructions
Tools required:
- Cable cutter
- 3 mm hex key
- 4 mm hex key
- Additional hex key for seat collar if needed
- Tape measure
- Pick or awl
- Silver Sharpie marker, vinyl tape or some other means of marking the cable outer housing and seat post lower tube
- Torque wrench with setting range that covers 4-6 Nm (for seat collar bolt and saddle clamp bolts)

Note: the bike must be supported in an upright position for the dropper installation. If you have an aluminum or steel bike, it may be safe to clamp the top tube in a bike stand to support the bike. We do not recommend clamping a carbon fiber bike on the top tube as the clamp could crush the carbon. Simply leaning the rear tire against a solid object (e.g. workbench) is usually sufficient support for dropper installation. A bicycle wheel stand also works great.
Seatpost Installation Process
- Open actuator valve to make sure dropper post is fully extended

-
Install dropper post intoframe, install saddle (see instructions below), move post up or down in seat tube to set saddle at desired riding height. Lightly snug seat collar bolt to hold in place for step 3

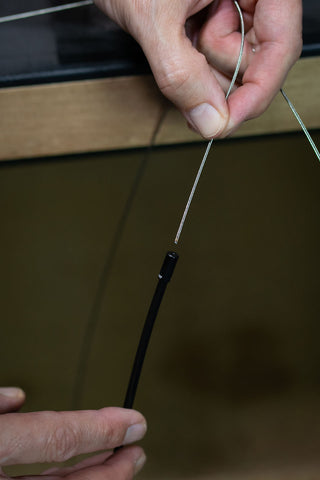
- Mark dropper lower tube at seat collar with silver Sharpie marker or electrical tape

-
Remove dropper post from frame, measure and record distance from mark on lower tube to end of actuator cable receptacle

-
Insert outer cable housing through frame until it is flush with the top of the seat collar


-
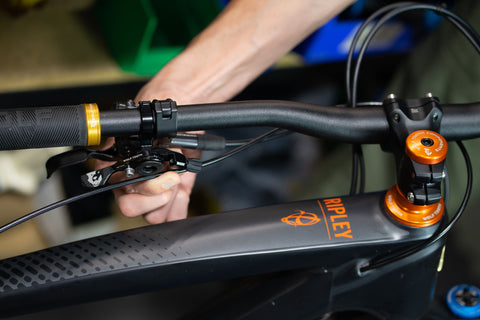
Install dropper remote in desired position on handlebar and turn barrel adjuster fully clockwise (all the way in)

- Turn handlebars fully to the left (at least 90°)
-
Route the outer housing in the desired service loop to the barrel adjuster of the dropper remote and cut flush with the barrel adjuster

- Pull/push outer housing upward out of seat tube until it is protruding at least the amount measured in step 4
- Make a mark on the outer housing at exactly the distance measured in step 4

- Cut the outer housing at the mark
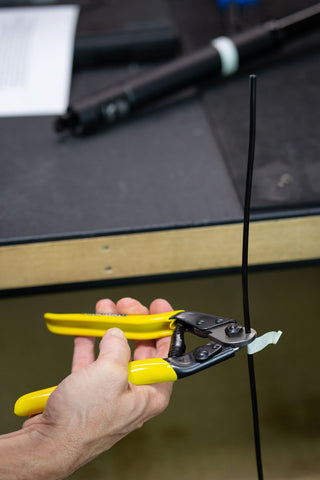
- Use an awl or pick to open up the inner plastic sheath of the housing as needed

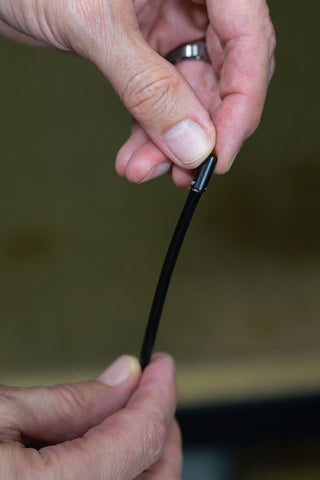
- Install supplied end caps (ferrules) on each end of the outer housing
-
Insert inner cable through cable barrel and begin inserting cable through outer housing from seat tube end until there are just a few inches/cm protruding from the outer housing


- Lightly grease the inside of the seat tube. If you have problems with the post slipping, carbon grip paste can be used but we recommend starting with grease

- Insert barrel into actuator arm of dropper post – this requires partially actuating the arm

- Push dropper post downward until end cap on outer housing is fully engaged with socket on post actuator

- Carefully push post about 1 inch (2.5 cm) into seat tube so that the post is supported enough to stay in position while guiding cable outer housing so it does not disengage from the actuator. Gently snug the seat collar bolt if needed
- Remove remote lever from handlebar and insert inner cable into remote
- Pull inner cable tight so outer cable housing/ferrule is fully engaged with barrel adjuster
- Tighten cable clamp bolt in dropper remote, cut to length and install crimped ferrule
-
 Turn barrel adjuster 1-2 full turns counter-clockwise (outward) to remove all slack from inner cable
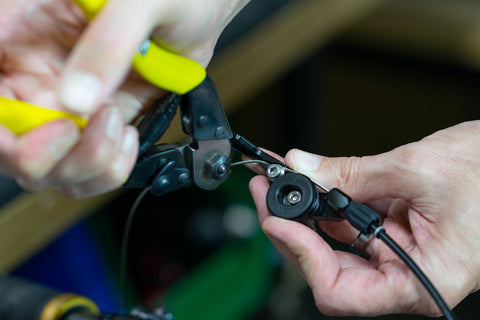

-
 Insert dropper post into frame up to height marked in step 3 while pulling on outer cable housing as needed to move it smoothly through the frame
 -
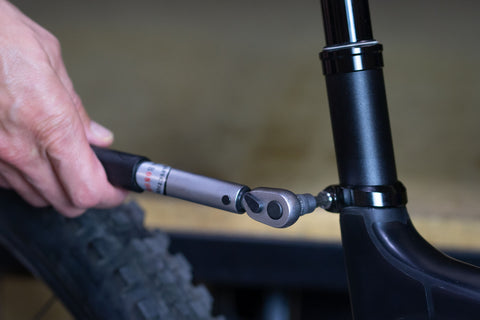
 Align saddle straight ahead and tighten seat collar (4Nm)
-
 Reinstall dropper remote on handlebar and verify operation of seat post
 -
 Barrel adjuster should be set such that the end of the remote lever must be depressed 4-5 mm before the post begins to move. Note: if the barrel adjuster is turned out too far (too much tension on the cable), the valve will not reliably close and the post may creep up or down. If the barrel adjuster is not turned out far enough (not enough tension on the cable), it will take extra lever travel to actuate the post and the valve may not open fully
7.2 Saddle Installation Process
- Insert the dropper post onto your bike frame or clamp it in a work stand. It’s very difficult to install the saddle while also trying to hold the dropper post
- Fully remove the two clamp bolts using a 4 mm hex key and remove the top clamp. Keep the barrel nuts in the top clamp


- Hold the saddle in one hand and with the other hand, slide the top clamp and barrel nuts into position from the back of the saddle. Confirm that the front side of the clamp is facing the front of the saddle (check arrows and “front” text)

- Set the saddle and top clamp together on the rail support arms of the seat post

- Reach in from the front or rear with your index finger to support one of the barrel nuts and insert one of the clamp bolts up from the bottom and thread a few turns into the nut


- Repeat step 5 for second bolt/nut

- Slide saddle forward/backward to desired position and adjust bolts to give desired saddle angle
- Torque bolts to 6 Nm and confirm saddle position/angle

7.3 Titanium Saddle Clamp Hardware
Titanium bolts and barrel nuts can be purchased separately for reduced weight (-7g) and improved visual appeal. The titanium hardware kit includes anti-seize compound that must be applied to the bolt threads and also to the spherical washers under the bolt heads. Failure to apply anti-seize may result in seizing of the bolts, making them impossible to remove. This is not covered by the warranty
Resolve Dropper User Manual • Rev C 06/10/24