Ripsaw Pedal User Manual and Service Guide
Contents
- Warnings & Precautions
- Installation Instructions
- Reliability and Testing
- Warranty
- Service Instructions
1.0 Warning – Read Before Installation or Use
- Read this guide and all other installation, service and maintenance documentation before installing or servicing your pedals.
- Bicycle pedals should always be installed, maintained and serviced by a qualified bicycle service technician in accordance with all instructions provided by Wolf Tooth. If you choose to install or service the pedals yourself, you assume all risk and liability for injury or damage.
- If you have any questions, issues, or concerns, please contact us by email at sales@wolftoothcomponents.com or call us at 855-965-3284 and leave a message. We will return your call promptly during normal work days and hours.
2.0 Installation Instructions
- Apply grease to the threads on the axle.
- Thread pedal axles into the corresponding left and right crank arms. If your cranks came with pedal washers, place the washer between the crank and the pedal.
- Left pedal axles are left hand (reverse) threaded. Turn counterclockwise to tighten. Right pedals are right hand (standard) threaded. Turn clockwise to tighten.
- Use an 8mm hex wrench to tighten the axle. Torque to 35-40Nm.
3.0 Reliability and Testing
Ripsaw pedals have been tested by an independent laboratory to verify that they meet the ISO 4210 safety standards. We have also performed extensive in-house testing on specially constructed equipment that exceeds the industry standards.
4.0 Warranty
Your new Wolf Tooth Ripsaw pedals are warranted for defects in material or workmanship for a period of five (5) years from the date of purchase. Proof of purchase is required for all warranty claims. The warranty applies only to the original owner and is not transferable. The warranty is at the sole discretion of Wolf Tooth Components, LLC and is limited to the repair or replacement of the defective part(s) and this is the sole remedy of the warranty. The warranty does not cover normal wear and tear, routine maintenance, improper installation or use. Wolf Tooth Components, LLC shall not be responsible for incidental or any other costs incurred by the user or warranty service provider that are not expressly covered by this warranty. Any modifications to the pedals or failure to follow installation and maintenance instructions voids the warranty. The user assumes all risk of injury or property damage if the pedals are modified or used improperly. Warranty duration and laws may vary from state-to-state and country-to-country.- Always contact us before returning a pedal for warranty evaluation (or any service). Include a detailed written description of the issue along with photos showing the issue if it is visible. Email with the subject “pedal warranty” to: warranty@wolftoothcomponents.com
5.0 Service Instructions
TOOLS REQUIRED
- 8mm hex wrench
- 5mm hex wrench
- 18mm socket wrench
- Torque wrench
- Pick
- Grease
- Clean rag
- Isopropyl alcohol
- Bushing removal tool (7/16” tap)
- Bushing installation tool
- Vise
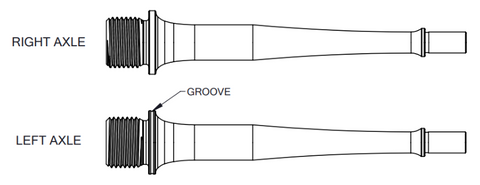
Please note that there are FOUR left and right specific parts…
-
The left axle has a groove around the lip closest to the pedal threads, the right axle does not.
-
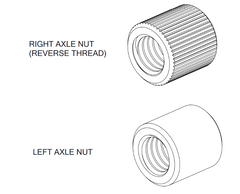
The left axle uses a smooth axle nut, the right axle uses a knurled axle nut.
-
The knurled axle nut is left-hand (reverse) threaded. Turn counterclockwise to tighten, and clockwise to loosen.
-
The knurled axle nut is left-hand (reverse) threaded. Turn counterclockwise to tighten, and clockwise to loosen.
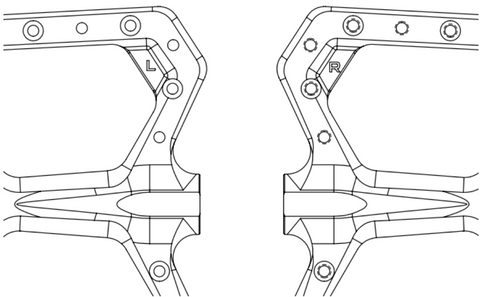
- The left and right pedal bodies can be identified by the L and R engraved in the corner.
-
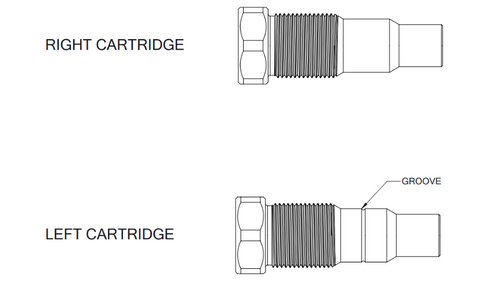
The left cartridge has a groove in the middle. The right cartridge does not. The right cartridge is left-hand (reverse) threaded, turn counterclockwise to tighten.
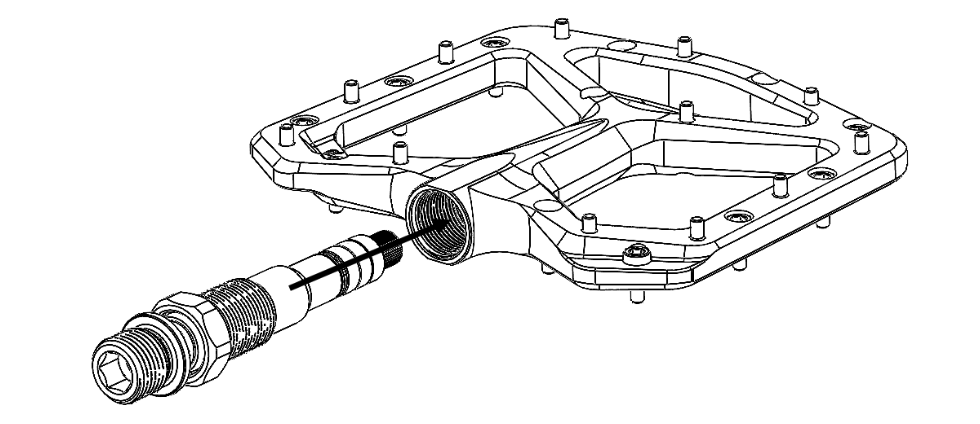
DISASSEMBLY
-
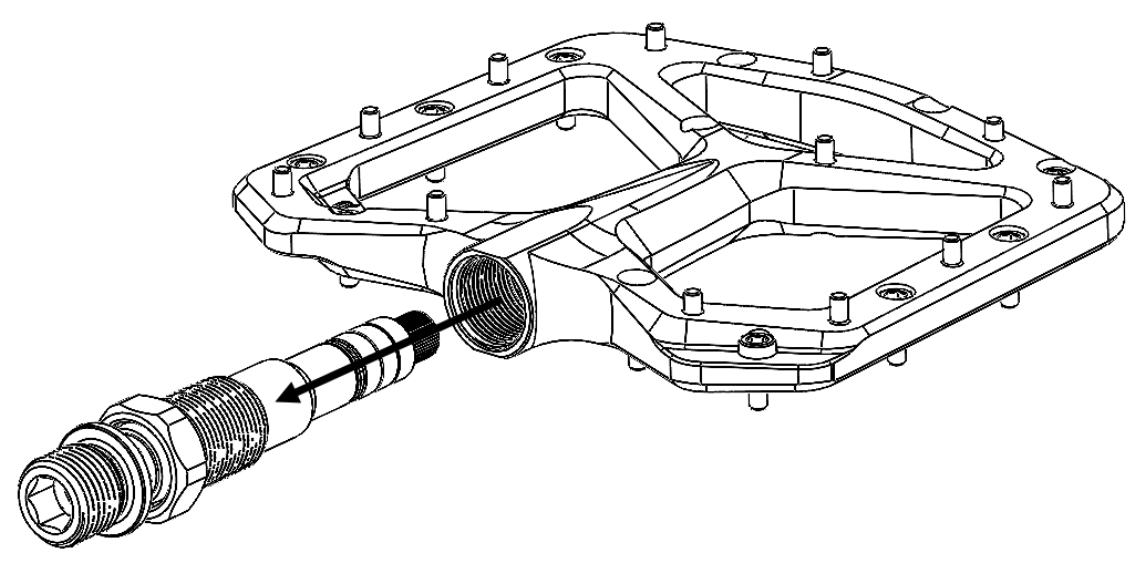
Use an 18mm socket to remove the cartridge from the pedal body. Note: the cartridge on the right pedal is left-hand threaded, turn counterclockwise to remove.
-
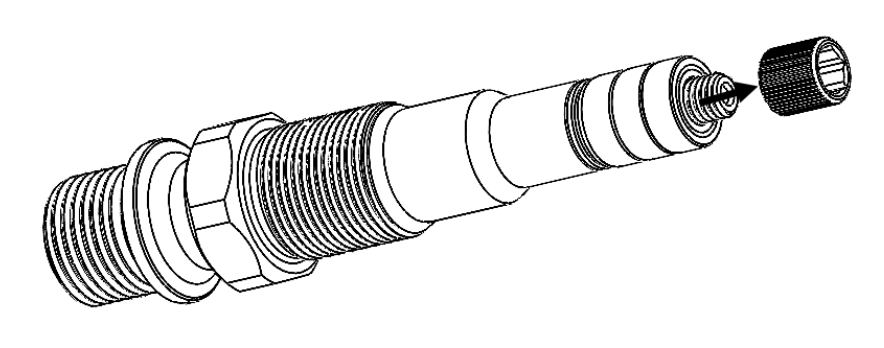
Insert an 8mm hex wrench into the end of the axle, and use a 5mm hex wrench to unscrew the axle nut from the end of the axle. Note: the right pedal uses a left-hand threaded axle nut, turn clockwise to remove. *The axle nuts should not be re-used after removal.
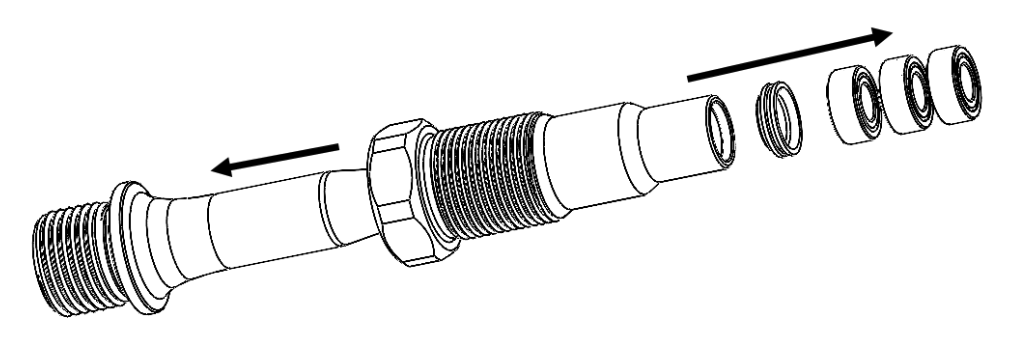
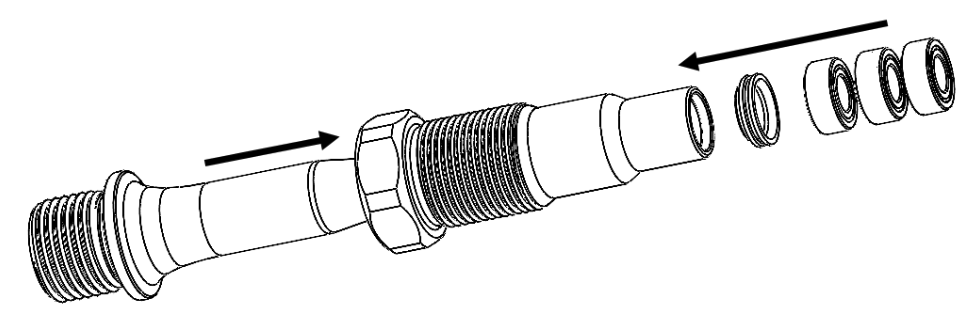
- Slide the bearings and compression washer off the axle, and slide the axle out of the cartridge.
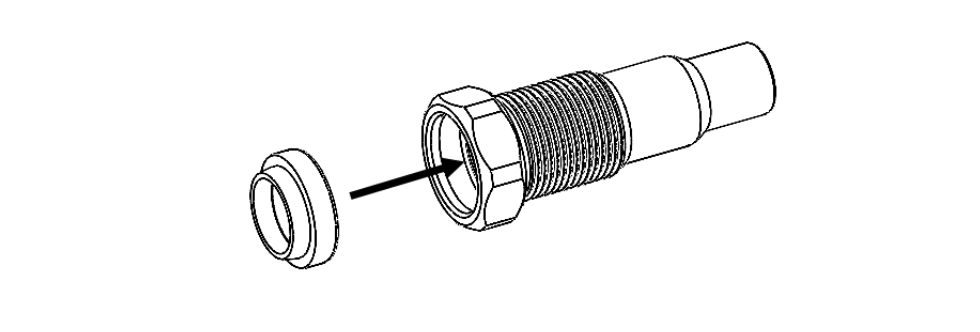
-
Use a pick to carefully remove the seal from the cartridge.

- The bushing has a long lifespan and can often be left in the cartridge while other parts are replaced. Inspect the bushing to see that it is still fully seated inside the cartridge and is flush with the inside face.
- If the bushing has crept out of its seat, use the bushing install tool to press it back in.
- Clean the cartridge and pedal body inside and out thoroughly with a clean rag and some isopropyl alcohol.
BUSHING REPLACEMENT (OPTIONAL)
- If the axle has excessive play in the bushing, or the bushing appears to be damaged, it will need to be replaced. The necessary tools for replacing the bushing can be found on the Ripsaw Replacement Parts page
- To remove the bushing, use a 7/16” tap. Thread the cartridge back into the pedal body and hold the pedal in a vise using soft jaws or a thick towel. Press the tap into the end of the bushing and use an adjustable wrench or tap handle to turn it clockwise to cut threads into the plastic bushing.
- Continue turning until the tap has cut threads for 6 or 8 revolutions. Don’t worry about damaging the bushing, as it is being replaced, but take care not to gouge the pedal body.
- Pull the bushing from the pedal body. It may help to hold the tap with the vise and pull on the pedal body.
- Clean the pedal body with isopropyl alcohol to remove any old grease, dirt, or debris from the inside of the pedal.
-
Slide the new bushing onto the bushing installation tool with the chamfered side at the tip of the tool.
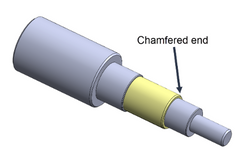
-
Firmly press the bushing into the cartridge, with the chamfered end going in first. The bushing should come to a stop when the end is flush with the cartridge.

ASSEMBLY
-
Insert the lip seal into the cartridge with the lip facing out. Press around the edge of the seal until it is fully seated.
- Apply a generous coating of marine grease (e.g. Motorex 2000) to the inside of the pedal body, on the bushing, and inside of the seal.
-
Slide the axle into the cartridge. Then place the compression washer over the axle, with the small diameter end facing the cartridge. It should fit into the end of the cartridge. Then slide the 3 bearings onto the end of the axle.
-
Thread on the axle nut. Remember that the right pedal uses the knurled axle nut with left-hand threads, and you will turn it counterclockwise to tighten.
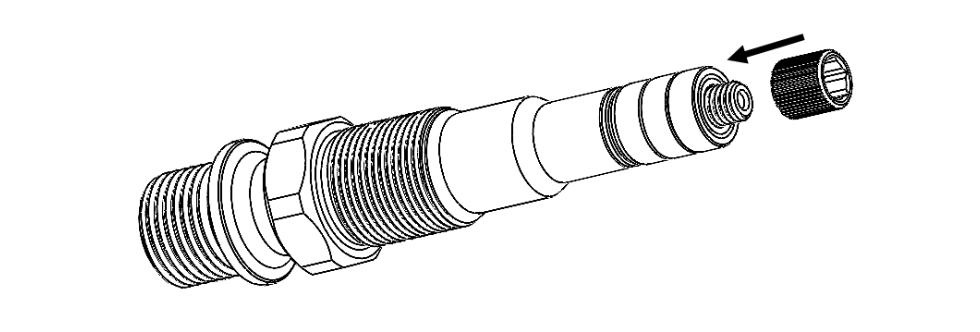
- Insert the 8mm hex wrench into the end of the axle, and finish tightening the axle nut with a torque wrench. Torque the axle nut to 5Nm. It is critical that this is torqued correctly with a torque wrench. Failure to properly tighten may result in the pedal falling off while riding.
-
Apply a few drops of blue Loctite to the threads of the cartridge. Thread the cartridge back into the pedal body and tighten it using the 18mm socket wrench. Use a torque wrench and torque to 11Nm.
- Spin the axle by hand to make sure the pedal spins smoothly without any unusual resistance or binding. If the bushing was replaced, the axle may feel tighter than before — this is normal, and will feel smoother after your first ride.
CARE AND MAINTENANCE
- Periodically inspect pedals for wear, damage, or loose components.
- Clean pedals with a damp cloth. Never pressure wash or spray water directly into the lip seal.
- The Wolf Tooth Ripsaw pedal is designed to keep moisture and debris out of the internal components of the pedal. Maintaining clean pedals with properly lubricated internal components will maximize the longevity of the pedals.
- Ripsaw rebuild services, as well as replacement parts and kits are available from wolftoothcomponents.com. If you have any questions or concerns about your pedals please contac sales@wolftoothcomponents.com .